Wednesday, November 13, 2013

Disable message "This site has requested that you identify yourself with a certificate:" in Thunderbird

Thunderbird as one(not the only one) annoying feature that it keeps asking you to chose a certificate to identify yourself. The text in the box is: "This site has requested that you identify yourself with a certificate:", then there is a drop-down menu to chose among your certificates, then there is a checkbox that says "Remember this decision", then the buttons "OK" and "Cancel".

Very nice, too bad it asks you for input every single time it needs to authenticate... this is real annoying, it seems the checkbox is there to taunt, because it feels Thunderbird cannot remember your decision...

The solution is simple, but you need to open the config editor "about:config":
  • Linux: Edit/Options -> "Advanced" section -> "General" tab -> "Config editor" button.
  • Windows: Tools/Options -> "Advanced" section -> "General" tab -> "Config editor" button.
  • Mac: Thunderbird->Preferences...->"Advanced" section -> "General" tab -> "Config editor" button.

Search for the entry "security.default_personal_cert" and change it to "Select Automatically" (default value is "Ask Every Time").

This information was collected from mozillazine forum http://forums.mozillazine.org/viewtopic.php?t=652927

Friday, October 04, 2013

Extend LVM volume

To extend a LVM volume, you need to add a physical volume. If you don't have the partition create, you need to create one using, the partition should be type Linux LVM (8E): cfdisk /dev/sda
After create the partition (you might need to reboot to see it.), create e physical volume
pvcreate /dev/sda3
Now you have to add physical volumes to a volume group:
vgextend VolGroup /dev/sda3
(you can figure out the name of you volume group run vgdisplay)
Now you need to extend your logical Volume to use the new space(you need to know how much will be the total size):
lvextend -L 8.5G /dev/mapper/VolGroup-lv_root
Now finally you can extend the filesystem, simply run:
resize2fs /dev/VolGroup/lv_root

Friday, July 12, 2013

Disable screen blanking during XBMC

I'm having a problem: the screen saver starts during the playing of movies in XBMC. Only XBMC is running and the screen blanks after 10min. I found the commands that disable it, but I still lack a way to do it permanently:
export DISPLAY=localhost:0.0
xset dpms 0 0 0
xset -dpms
xset dpms force on
xset -q
To make the changes permanent I added the following lines in the file
~/.xbmc/scripts/autoexec.sh

xset dpms 0 0 0
xset dpms force on
echo $(date) '~/.xbmc/scripts/autoexec.sh: Touching xset' >> ~/myxbmc_log.txt
xset -q >> ~/myxbmc_log.txt
echo $(date) '~/.xbmc/scripts/autoexec.sh: Checking screensaver:' >> ~/myxbmc_log.txt
gnome-screensaver-command --query >> ~/myxbmc_log.txt

Friday, March 01, 2013

Missing feature in MacOS mail: Archive

Thunderbird has a very nice feature, the archive button, that will send the selected emails into an archive folder.
So I created a service that does that, it will go through the selected emails, and it will archive them in "[Gmail]/All Mail" if the account server contains the string gmail, and Archive/<year> if not. 

The workflow can be found here.
 TODO: is still error handling if the destination mailbox does not exist.

To Install unzip to the folder ~/Library/Services.

Saturday, February 02, 2013

thunderbird signin problem

certificate problem
Could not verify this certificate for an unknown reason

Solution, check the certification autority->Edit trust and possibility to:
  •  this certificate can identify websites
  • this certificate can identify mail users

Burning an DMG into a USB drive using macOS X snow leopard

To burn a dmg to a usb drive, you only have to open Disk utility Select the destination partition or the origin image, right click a choose restore, then you will be lead to a dialog window were you can specify the origin and destination of the restore. Then click restore and you are done. Simple right? But when thing simply do not work? So I had just clicked restore and I see the message:
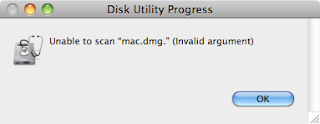
So I need to scan the image? Easy, in Disk utility go to Image->Scan image for restore... . Select the image you want to scan and click scan. Insert the administrator password and you are all done, right? Wrong, I got this very useful message:
What do you mean, "invalid argument" ??? I'm not using command like this is a freaking GUI!!! You should figure what arguments are to be used! Oh well, lets see the log file for some info:
And the log file says the problem was "invalid argument"! Great! Very useful! Google time.... After a bit of search I came to the website and there was a comment:
So... Snow leopard cannot scan a read/write image? Ok, sounds we are back in the right track, lets convert this sucker. To convert an image go to the Disk utility and select Images->Convert... . You get a window asking for you to select the original image, and then you are let to the window with the destination options, make sure you select the image format to read-only:
And wait... After that is done, you still need to scan the image, in Disk utility go to Image->Scan image for restore... , This time it is working:
And.... Worked!
So now I'm ready to burn the image into a USB drive... The thing I actually want to do. So I right click on the destination partition, and select Restore:
Then I'm back to the dialog where I have to select restore image and destination.
I press restore and this time I'm successful.

One more thing...

Another thing, apparently the destination partition has to be a "Mac OS Extended (Journaled)", and the partition table has to be "GUID Partition Table". The partition type will be asked of you by the Disk utility when you create the partition, but for the partition type, you have to click the button "Option..." and then select the GUID partition type:

Sunday, January 13, 2013

Thursday, January 03, 2013

Free audiobooks

You can use google to find free audiobooks from audible, the search string is:

 $0.00 -Excerpt -Interview -Chapter -Extract -Speech -Sample -"A Conversation" -"This is Audible" site:audible.com 
or you can follow the link here. Tip from lifehacker.