- Shift: Starts your Mac in safe mode. This helps you troubleshoot because it only loads the minimum necessary kernel extensions at boot then disables startup items, user-installed fonts, font caches, kernel caches, and other system cache files. Safe mode also runs a file system check automatically, which should help with troubleshooting.
- Option: This loads up the startup manager where you can pick between different hard drives or discs to boot into. If you need to boot from a hard drive different than your primary one, or you’re booting into Boot Camp, this is the key you push.
- C: Boots from a bootable CD, DVD, or USB. This is useful when you’re installing a new operating system.
- D or Option+D: Starts the Apple Hardware Test on pre-2013 Macs or Apple Diagnostics on newer Macs. Both are meant to help troubleshoot hardware issues. N or
- Option+N: Starts up from a Netboot server. Most average users will never need to use this as it’s meant for running OS X off a network instead of a hard drive or disc drive.
- Command+R: Starts up in Recovery mode. If you have problems with your hard drive, OS X Recovery allows you to restore your Mac from a backup, verify and repair your disc, check your internet connection, or reinstall OS X.
- Command+Option+R: Starts up the internet version of Recovery mode, which works the same as regular Recovery mode, but is online.
- Command+Option+P+R: This resets the NVRAM. NVRAM stores information about speaker volume, screen resolution, startup disk selection, and recent kernel panic information. If you’re having issues with sound or video, it’s usually a good idea to reset the NVRAM before panicking.
- Command+S: Starts up in single-user mode. This is meant mostly for developers and IT as a means to troubleshoot startup issues and basically drops you into the command line where you can run tests without worrying about the GUI in OS X.
- Command+V: Starts up in verbose mode. Verbose mode is similar to single-user mode but is meant more as a way to watch what a computer is doing to help with troubleshooting.
- T: Starts your Mac in target disk mode. This is a useful way to share files between two Macs when one of them is broken or the display isn’t working.
- Eject button, F12, mouse button, or trackpad button: Force eject an optical disk.
Showing posts with label macos. Show all posts
Showing posts with label macos. Show all posts
Friday, February 26, 2016
All the Special Key Combinations that Change Your Mac's Startup
From http://lifehacker.com/all-the-special-key-combinations-that-change-your-macs-1761327018
Thursday, October 01, 2015
Saturday, July 25, 2015
Raspberry pi timemachine
I recently followed this post to install the timemachine in my raspberry pi:
http://blog.lobraun.de/2015/05/10/create-a-timemachine-backup-storage-on-the-raspberry-pi/
Before I had used this one:
http://www.andadapt.com/raspberry-pi-raspbian-hfs-afp-and-time-machine/
But the hfs kept corrupting in a unrecoverable way.
Friday, March 01, 2013
Missing feature in MacOS mail: Archive
Thunderbird has a very nice feature, the archive button, that will send the selected emails into an archive folder.
So I created a service that does that, it will go through the selected emails, and it will archive them in "[Gmail]/All Mail" if the account server contains the string gmail, and Archive/<year> if not.
The workflow can be found here.
TODO: is still error handling if the destination mailbox does not exist.
To Install unzip to the folder ~/Library/Services.
So I created a service that does that, it will go through the selected emails, and it will archive them in "[Gmail]/All Mail" if the account server contains the string gmail, and Archive/<year> if not.
The workflow can be found here.
Saturday, February 02, 2013
Burning an DMG into a USB drive using macOS X snow leopard
To burn a dmg to a usb drive, you only have to open Disk utility Select the destination partition or the origin image, right click a choose restore, then you will be lead to a dialog window were you can specify the origin and destination of the restore. Then click restore and you are done.
Simple right? But when thing simply do not work?
So I had just clicked restore and I see the message:
 So I need to scan the image? Easy, in Disk utility go to Image->Scan image for restore... . Select the image you want to scan and click scan. Insert the administrator password and you are all done, right? Wrong, I got this very useful message:
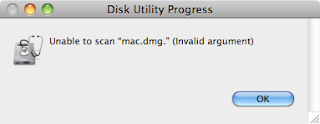 What do you mean, "invalid argument" ??? I'm not using command like this is a freaking GUI!!! You should figure what arguments are to be used!
Oh well, lets see the log file for some info:
What do you mean, "invalid argument" ??? I'm not using command like this is a freaking GUI!!! You should figure what arguments are to be used!
Oh well, lets see the log file for some info:
 And the log file says the problem was "invalid argument"! Great! Very useful! Google time....
After a bit of search I came to the website and there was a comment:
And the log file says the problem was "invalid argument"! Great! Very useful! Google time....
After a bit of search I came to the website and there was a comment:
 So... Snow leopard cannot scan a read/write image? Ok, sounds we are back in the right track, lets convert this sucker.
To convert an image go to the Disk utility and select Images->Convert... .
You get a window asking for you to select the original image, and then you are let to the window with the destination options, make sure you select the image format to read-only:
So... Snow leopard cannot scan a read/write image? Ok, sounds we are back in the right track, lets convert this sucker.
To convert an image go to the Disk utility and select Images->Convert... .
You get a window asking for you to select the original image, and then you are let to the window with the destination options, make sure you select the image format to read-only:
 And wait... After that is done, you still need to scan the image, in Disk utility go to Image->Scan image for restore... , This time it is working:
 And.... Worked!
 So now I'm ready to burn the image into a USB drive... The thing I actually want to do.
So I right click on the destination partition, and select Restore:
So now I'm ready to burn the image into a USB drive... The thing I actually want to do.
So I right click on the destination partition, and select Restore:
 Then I'm back to the dialog where I have to select restore image and destination.
 I press restore and this time I'm successful.


One more thing...
Another thing, apparently the destination partition has to be a "Mac OS Extended (Journaled)", and the partition table has to be "GUID Partition Table". The partition type will be asked of you by the Disk utility when you create the partition, but for the partition type, you have to click the button "Option..." and then select the GUID partition type:
Sunday, January 13, 2013
Look inside a installer package
Suspicious package is a finder plugin that allows you to look inside an installer package without opening it.
Friday, July 06, 2012
Here are some useful shortcut keys for the open/save dialog window of macos X:
Spacebar – View the selected item in Quick Look
Command+D – Selects Desktop as the destination
Command+Shift+H – Sets the Home directory as the destination
Command+Shift+A – Sets Applications directory as the destination
Command+Shift+. – Toggle invisible items
Command+Shift+G – Bring up Go To Folder window
Tab – Tab key auto-completes paths and file names from the aforementioned Go To window
Command+R – Open the selected item in the Finder
Command+F – Move the cursor to the Find field
Command+. – Close the Open/Save dialog window
Friday, April 13, 2012
MacOS X Dicionary shortcut
To access the inbuilt MacOS Dictionary you can select a word and press
ctrl-cmd-d, you will get the dictionary entry for the selected word.
This only works in the more integrated programs: Safari, iWork, etc..
Wednesday, April 04, 2012
dfc: df in color
Very nice program that does the same as
df, but with pretty colors.
You can find it in the development page http://projects.gw-computing.net/projects/dfc
Thursday, March 22, 2012
Go to next unread message in Mail via keyboard
A long standing annoyance in Mail is that there is no keyboard shortcut to skip to the next message.
I found in hints.macworld.com a apple script that will jump to the next unread mail on
I changed the script to jump to the last item and not the first, as I like to read my messages by chronological order.
ctr-n.
I changed the script to jump to the last item and not the first, as I like to read my messages by chronological order.
try
 tell application "Mail"
  activate
  tell the front message viewer
   set unreadMessages to (the messages whose ¬
    read status is false) as list
   if (count of unreadMessages) is not 0 then
    set selected messages to {the last item of unreadMessages}
   else
    beep
   end if
  end tell
 end tell
on error error_message
 beep
 display dialog "Error looking for next unread message: " & ¬
  return & return & error_message buttons {"OK"} default button 1
end try
no input" in "Mail.app" that will run the apple script on the top.
Saved the service, and added the shortcut ctrl-n in the keyboard settings.
Monday, March 05, 2012
Great clipboard manager
FlyCut seems to be a very nice clipboard manager, based in the Jumpcut.
You can find it in the App store, or bettr yet in the git: https://github.com/TermiT/flycut
Thursday, February 23, 2012
Add your kerberos password to keychain
The magic command is:
security add-generic-password -a "myusername" -l "label to define entry" -s "realm" -w "mypassword" -c "aapl" -T "/usr/bin/kinit"
Thursday, February 09, 2012
Create shortcut by click and drag in Mac OS X
To create a shortcut in Mac Os X you can right-click (click+ctrl) and chose the option "Make alias", and then move this alias where you want it.
Or you can drag the target of the alias and also press Command(apple button)+option. The alias will be created where you drop the file.
Or you can drag the target of the alias and also press Command(apple button)+option. The alias will be created where you drop the file.
Friday, January 06, 2012
Controling airport from command line
I wrote two small scripts to control the power status of the mac airport.
- Power cycle the airport
- Toggle the power status
#/bin/bash
# This script does a power cycle of the airport
# Pedro Parracho <pedro.parracho@gmail.com>

/usr/sbin/networksetup -setairportpower airport OFF
/usr/sbin/networksetup -setairportpower airport ON
#/bin/bash
# This script toogles the power status of the airport
# Pedro Parracho <pedro.parracho@gmail.com>

airportPower=$(/usr/sbin/networksetup -getairportpower airport| cut -d' ' -f4 | tr '[:lower:]' '[:upper:]')

if [ $airportPower = "ON" ]
then
    echo airport is ON, turning it OFF
    /usr/sbin/networksetup -setairportpower airport OFF
else
    echo airport is OFF, turning it ON
    /usr/sbin/networksetup -setairportpower airport ON
fi
Friday, December 02, 2011
Fine grain control for volume and brightness
MacOS offers a way to get a finer control on the steps of increase and decrease of volume and screen brightness, to access the fine grain mode, also press the keys shift+option when changing the sound or brightness level.


Subscribe to:
Posts
(
Atom
)